|
|||
|
|
|||
       |
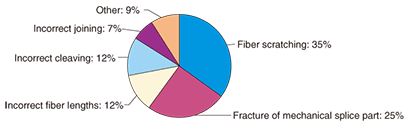
Feature Articles on Technical Solutions to Real-world Problems Vol. 9, No. 7, pp. 11–13, July 2011. https://doi.org/10.53829/ntr201107fa2 Fault Cases and Countermeasures for Field Assembly Connectors in Optical Access FacilitiesAbstractWe have investigated faults with field assembly connectors that had been breaking down in optical access facilities. These faults were caused by fiber scratching, fracture of the mechanical splice part, incorrect fiber lengths, incorrect cleaving, incorrect joining, and so on. All these causes can be eliminated by countermeasures such as correct use of tools and proper procedures. 
1. IntroductionNTT EAST and NTT WEST had more than 15.1 million customers using optical fiber broadband services (FLET’S HIKARI) at the end of March 2011. This rapid expansion has been accompanied by unexpected faults in optical access facilities. NTT EAST Technical Assistance and Support Center provides consultation on a variety of fault cases and strives to maintain a high-reliability network. This article introduces fault cases and countermeasures for field assembly connectors, which are used to join optical fibers in optical access facilities. 2. Field assembly connectorsA field assembly connector is composed of three main parts: the ferrule, mechanical splice, and clamp. There are several kinds of field assembly connectors such as the field assembly small-sized (FAS) connector. The connector assembly procedure has six steps as follows: (1) Strip the 0.25-mm-diameter fiber coating from the optical fiber using a mechanical stripper. (2) Clean the stripped fiber (bare fiber) with alcohol. (3) Cut the bare optical fiber to the correct length using a fiber cleaver. (4) Insert this bare optical fiber into the mechanical splice part inside the field assembly connector. (5) Join it to the built-in optical fiber inside the ferrule. (6) Fix the position of the bare optical fiber by releasing the wedge from the mechanical splice inside the connector. 3. Fault cases with field assembly connectorsIn fiscal year 2009, we investigated faults with field assembly connectors that had broken down in a certain region of Japan. The direct causes of the faults are summarized in Fig. 1. We also found that these connectors often have multiple causes in addition to the direct causes. All of the direct causes of connector faults are detailed below in order of occurrence frequency.
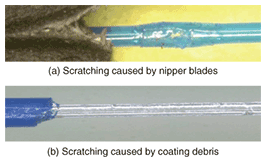
3.1 Fiber scratching3.1.1 Fault casesA scratch on an optical fiber can grow with time and eventually lead to fiber breakage. Examples of failures of this kind are shown in Fig. 2. Such scratches can be made when the sheath is removed from the optical fiber drop cable if the blades of the wire nippers damage the fiber. They can also be made when the fiber coating is removed from the coated optical fiber if coating debris from previous stripping was left on the blades of the mechanical stripper.
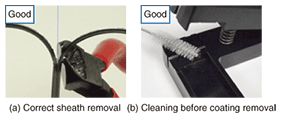
3.1.2 Countermeasures(1) Remove the sheath carefully without the nipper blades damaging the optical fiber, as shown in Fig. 3(a), so as not to scratch the fiber. (2) Clean the mechanical stripper before removing the fiber coating, as shown in Fig. 3(b).
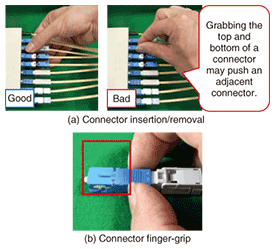
3.2 Fracture of mechanical splice part3.2.1 Fault casesWhen an optical connector is carelessly inserted into or removed from equipment, lateral force can be accidently applied to an adjacent connector. This force can damage the mechanical splice part inside the connector and lead to fracture of this part (Fig. 4). The fracture may result in fiber breakage. In addition, when the connector is inserted into or removed from equipment at an inclination to the optical connector adapter, force can be applied to the connector, which can cause the mechanical splice part to fracture.
3.2.2 Countermeasures(1) Be careful not to push adjacent optical connectors (Fig. 5(a)). Hold the finger-grip of an optical connector correctly when inserting or removing it (Fig. 5(b)). (2) Insert an optical connector into or remove one from equipment horizontally with respect to the optical connector adapter.
3.3 Incorrect optical fiber length3.3.1 Fault casesFailure to set the optical fibers in the tools correctly can lead to an incorrect length and may result in fiber breakage or an increase in loss. Examples of incorrect optical fiber lengths are shown in Fig. 6.
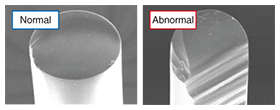
3.3.2 Countermeasures(1) Set the bare and coated optical fiber in the proper tools correctly. (2) Use the scale marks on the fixture of the field assembly connector to measure the bare and coated optical fiber lengths before joining to the built-in optical fiber. 3.4 Incorrectly cleaved fiber end3.4.1 Fault casesIf there are no problems with the fiber cleaver, the fiber will be cleaved correctly and have a correct, flat, and smooth end perpendicular to the fiber axis. However, if there are problems, the fiber end will have an incorrect and uneven end (Fig. 7). An incorrectly cleaved fiber end can lead to abnormal joining to the built-in optical fiber and may result in an increase in loss. A fiber end can be incorrectly cleaved for several reasons. For example, the fiber end can be cleaved incorrectly with a dropped cleaver or one that has struck something because a fiber cleaver is precisely fabricated and is a sensitive tool. Moreover, a defective or worn cutter blade may also lead to an incorrectly cleaved fiber end.
3.4.2 Countermeasures(1) Inspect a cleaved fiber end regularly (about once a week) to ensure good cleaving quality (using the display screen of an arc fusion splicer to view the cleaved fiber ends). (2) Replace fiber cleaver blades (when incorrect cleaving is noticed or about once a month). (3) Request the manufacturer to repair the fiber cleaver if no improvements result from the above countermeasures. 3.5 Incorrect join to built-in optical fiber3.5.1 Fault casesFailures to correctly join an optical fiber to the built-in optical fiber in the mechanical splice part can lead to a large gap, which may result in an increase in loss. 3.5.2 Countermeasures(1) Ensure that the wedge is correctly installed before inserting the bare optical fiber. (2) Join the bare optical fiber to the built-in optical fiber and check that the fiber is sagging appropriately before releasing the wedge and fix the fiber. 4. ConclusionThis article introduced fault cases and countermeasures for field assembly connectors. All of the causes of faults can be eliminated by countermeasures such as correct use of tools and proper procedures. Looking forward, NTT EAST Technical Assistance and Support Center aims to accumulate and disseminate a variety of techniques and technologies for maintaining high-reliability network facilities. |
||